(In response to hp-gliders news group question.)
I'm no expert on the subject, but I do just now happen to be in the middle of building and installing flaps and ailerons on an HP-14 wing. I can offer a few things that I think might help:
First, read all of the information that Wayne has suggested. This is important. I assume you have the blueprint for the wing, I believe it is drawing number 14-100. Study it very carefully; there is a whole lot of detail and information there.
The steps I used to build the flaps went something like this:
1) Build all of the magnesium ribs very carefully as they are the foundation for your flaps. If the ribs are wrong then so will be your flaps. You will need a 3/8" drill bit for drilling the holes so you can rivet the skin to the ribs. You will need a 1/4-28 tap and corresponding drill bit for installing the AN bolts (that ultimately become the means of connecting the flap sections together. You will need a 1/4" drill bit. I used cobalt drill bits. Production tool supply is a good source.
|
The 3/8" holes in my ribs are not too close to the edges so I had to use long pop-rivets (.375" and .5" shank). |
2) You must build the ribs in pairs. It is critical that the outboard rib for flap section #1 have its bolt connection holes be perfectly matched to the inboard rib of flap section #2. And so forth. Mark the ribs with a silver pencil or something so you can keep track of which is which and what is the orientation. The 3/8" holes aren't so critical but it is a good idea to locate them consistently and properly such that your rivets can be used. When drilling and tapping the holes you must use a drill press in order to get them perfectly straight. I even used the drill press chuck and bed to manually get the tap started in the boltholes. No power on the drill press, just mount the tap in the chuck and turn slowly by hand while applied downward pressure. Once the tap is started you can remove everything and finish up with a conventional tap handle.
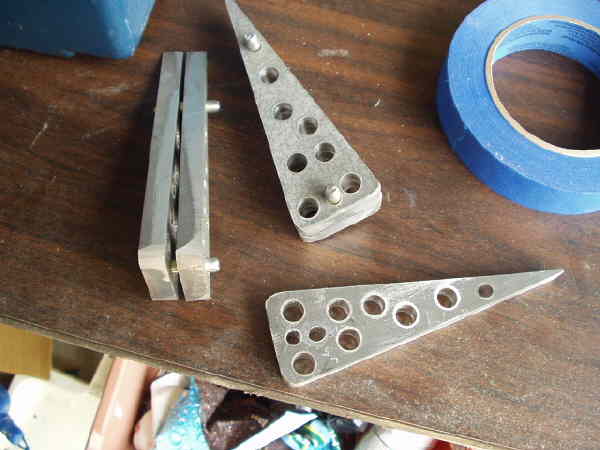
3) You need to make a couple of decisions here. I'm not sure of the best way but here is what I did with success. The steel "sockets" that mount in the inboard section of flaps #1 and are the receptacles for the flap driver mechanism. How to attach them to the flap? I didn't think using the AN426 3- solid rivets alone was enough. And I worried about fit interference. I chose to cut up some 1/8" aluminum angle and pop-rivet (using quality cherry rivets) to the outboard side of the sockets. This gave me a lot more area to install pop-rivets through the skin. You also need to decide how to rivet the magnesium ribs to the skin. I tried the Schreder-suggested method of using solid AN426 3- rivets and using a ground-down 3/8" bolt for bucking. I just couldn't make it work. In the end I decided to use quality cherry pop-rivets for this as well. I used 1/8" pop-rivets with countersunk-style heads. You must purchase rivets with the correct shank length. Here it depends on where you located your 3/8" holes in the ribs. Mounting the steel sockets in flap section #1. I wound up also gluing with Hysol epoxy and running a few AN426AD 3- solid rivets through the skin and steel socket. I then had to file small "channels" into the aluminum driver extenders to clear the rivets. (Sailplane Service Bulletin 7-1-86)
4) I found it necessary to round the corners of the ribs to get a good fit with the sheet metal. Also about 1/16" - 1/8" of the rib tips (trailing edge) should be removed.
5) CRTIICAL STEP. Test assemble the upper and lower flap sheet metal to your ribs. Use clamps to hold it together. Measure carefully the final assembly width of the flap leading edge. It MUST fit properly onto the trailing edge hingeline of your wing. You may need to shave a small amount of material off of the magnesium ribs to get a good fit. If you do, remember to always do this in pairs! Otherwise your flap sections won't line up together when assembled.
6) Assemble the sheet metal. I found that the flap top pieces had to have the front face sheet metal trimmed by 1/4" or so. It is *much* easier to do this before you assemble the two halves. Measure the mating part of your wing, decide how much to trim and do it.
7) Notice that you have 2 different thicknesses of sheet metal for the flaps, .040" and .025". Use the thicker pieces on your inboard sections.
8) By all means purchase the 4' long aluminum bars that Schreder suggests for clamping the sections together during gluing of the trailing edges! I also purchased a couple of 6' high quality 1 x 2 x 1/2" hardwood from Home Depot. I found I needed this in order to raise the sheet metal high enough off of the worktable during gluing. I used Hysol EA9430 epoxy because this is the best stuff there is for gluing Aluminum together. Clean the entire sheet metal surface with lacquer thinner as Schreder says (actually I suppose only the gluing surfaces need it, but why not clean up everything). The using diluted Alumi-Prep and Scotch-Brite scouring pads acid etch the trailing edge surface that are to be glued together and wash with water. In my opinion, you should then glue within 2 hours of acid etching to avoid oxidation. Here's a tip that can save a lot of grief. I used a mold release on the clamping bars just in case some of the epoxy ran out. You will do hell removing the bars from your flaps without it. I used Partall Mold Release ( p/n = #10 from Wicks Aircraft Supply).
9) Apply the glue and clamp and check for straightness as Schreder directs. Let it cure overnight. After curing use a file or sanding block to remove excess epoxy.
10) Locate and drill your #41 holes for the AN426 3-2 rivets that go in the trailing edge. Locate the holes about 1/8" outboard of the bend line. I installed rivets every two inches instead of every one inch because I believe the glue is that good. But this is up to you. I strongly recommend that the rivet heads be placed on the *top* of the flaps, not the bottom. You can then file the rivet tops flush with the skin and the protruding rivet bottoms will be totally concealed by the filler material at the bend line.
11) Fitting the flaps to the wing. I would recommend that you fit the inboard flap sections with the wings mounted to the fuse. This way you can see how far inboard to locate and also determine with precision where the mounting sockets must be located.
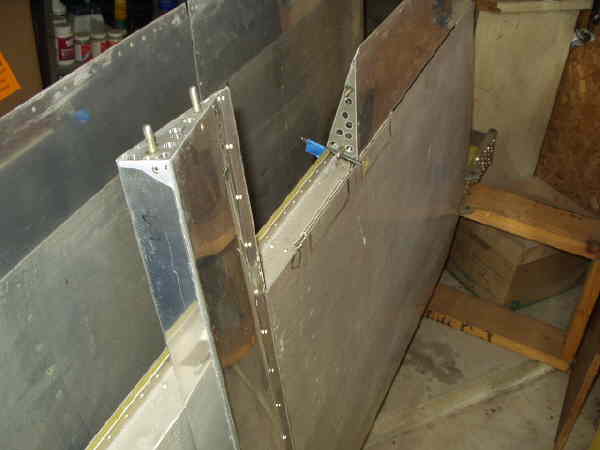
I have worked out an easy and reliable method for achieving perfect alignment when installing flap or aileron sections. Use strong, thin double-sided sticky tape. First you completely install the hinges that attach to the wing. Then you prepare the mating hinge sections that install on the flap (or aileron). Mate the hinges with hinge pins. Place the sticky tape on the hinge surfaces that will attach to the flap. In the photo you can see where I have installed the white sticky tape on all 3 hinges for a flap section (one hinge is hidden by the flap section leaning against the wing). The flap section at this point need only have the minimum number of rivets installed to hold it together and define its final shape. I find this is one rivet in each rib's "front face"(through both skins and the rib) and one rivet in each rib through the top or bottom skin and one rivet approximately half way between both ribs to hold the middle part of the flap front face together (5 pop-rivets total). It is good to minimize the number of rivets at this point in case you make a mistake you can drill them out and reposition.
|
The sticky tape makes the critical hinge alignment easy and fast. Maybe there is a better way, I don't know. But this way worked great for me. |
Anyway, after the sticky tape is in place then simply install the flap section in its final position. Then carefully press each sticky-tape hinge part against the flap. Use an extra piece of hinge wire to get under the hinges and press them up against the flap. You can then firmly set the tape by carefully rocking the flap(s) assembly open just enough to get your fingers underneath the hinges. Press firmly to assure the tape sticks securely with the hinges in proper location. Then carefully remove the 3 hinge pins for that section. Note that I am using the hinge option of bending the ends of the hinge pin 90 degrees (I think this is better than using the cotter pin option shown on the drawing). At this point only put a bend in one end of the hinge pin. That way it is easy to install/remove many times during construction. You will also have to remove the nearest pin of the mating flap section in order to get the flap section out so you can remove the section with the hinge stuck perfectly in place by the tape.
Now with the flap section removed you can permanently install the hinges with pop rivets. If you are confident of the hinge position then install all pop-rivets. A more conservative approach would be to install just two pop-rivets in each of the three hinges in case you have to reposition. I found that the hinges were located perfectly every time. First drill just two holes in each hinge. Drill #30, go all the way through the two flap skins. Remove the hinge. Remove the sticky tape. Cleco the hinge back in place. Drill the rest of the attachment holes (#30). Remove the clecos and clean away all chips, especially chips between the skins. Re-cleco the through the two holes and then install final pop-rivets, remove clecos and pop-rivet those two holes. Do the same for the other two hinges. Then test fit the flap section to the wing. It should be a perfect fit providing the sticky tape did not shift.
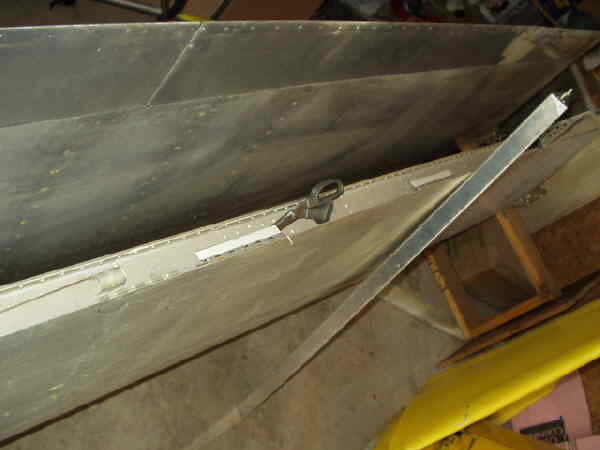
In the photo below you can see where I place a 3/16" drill bit between sections in order to get the proper gap.