INSTRUCTIONS FOR ADDING BALSA
TO TOP OF FLAPS AND AILERONS
by
Bruce Patton
Putting the Balsa on the
top surface
1. Check how much you need to add when the flaps and ailerons are on the
wing. Record how much to add at each end of each surface.
2. Remove surfaces and take off the paint down to aluminum on the top surface.
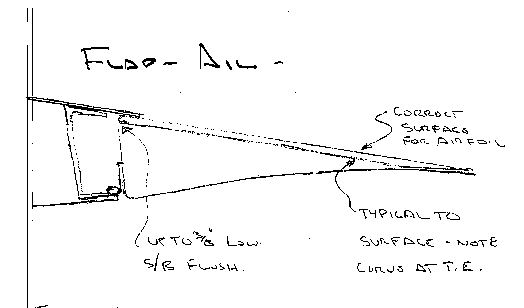 3.
Cut balsa to overhang the LE and TE about ½" or so. Grain runs parallel to the
surface so it can easily be bent to fit into the concave curve near the trailing
edge. (See sketch). I used medium balsa, nothing special, about 1/8" thicker
than needed. Use the full thickness, the jig makes it very easy to remove the
large excess at the trailing edge. You can splice the ends of the sheets together
just by butting it on the surface.
3.
Cut balsa to overhang the LE and TE about ½" or so. Grain runs parallel to the
surface so it can easily be bent to fit into the concave curve near the trailing
edge. (See sketch). I used medium balsa, nothing special, about 1/8" thicker
than needed. Use the full thickness, the jig makes it very easy to remove the
large excess at the trailing edge. You can splice the ends of the sheets together
just by butting it on the surface.
4. Rough up the aluminum with scotchbrite pads.
5. You can then alodine or treat the exposed surface. I didn't and after
15 years there is no sign of any problems.
6. Glue the balsa on each surface with EA 9410. If you butt the balsa together,
don't glue the ends together, makes sanding slightly more difficult. EA 9410
sticks great to the aluminum and balsa. I used spring clamps on the trailing
edge to be sure the balsa went into the concave surface on top of the surface.
You can tear up the balsa some, it will be sanded off. Put weights on the rest
to be sure you get a good contact and glue joint.
7. Trim flush with the front and trailing edge of the flap or aileron.
Building and using the Jig
 1.
I used a piece of 2 X 10 a bit longer than the longest section. Should be fairly
flat, but does not need to be perfect.
1.
I used a piece of 2 X 10 a bit longer than the longest section. Should be fairly
flat, but does not need to be perfect.
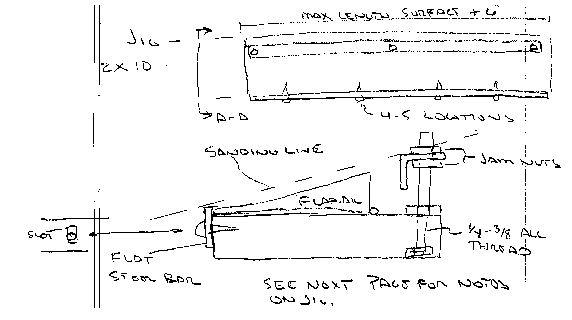
2. The flat bar on the trailing edge should be steel with slots to allow
adjustment up or down. If you use aluminum it gets sanded away and you have
to adjust it after every couple of sections. When properly adjusted it will
stick up about 3/32" above the surface of the board.
3. I used an aluminum angle about 1 X 1" mounted on ¼" all thread so it
can be adjusted up or down. It needs at least three all threads to be stiff
enough. Place the outer two supports beyond the ends of the longest section.
See Sketch.
4. Make a long sanding block, about 2" wide with rough paper, don't use
finish paper to rough out the balsa. I recall using 80 grit.
5. Hold the widest piece you are sanding, for example the first flap, against
the rear bar. Adjust the angle so you are 1/8" or so above the balsa at the
front of the flap. Sand at the largest end, being careful that you don't gouge
the trailing edge. Adjust the rear bar so you just expose the aluminum at the
trailing edge. The rear bar will be the same height the full length of the jig
(if your flaps and ailerons don't have a twist).
6. Now adjust the front angle at both ends so you take off just a little
of the balsa at the leading edge. Let the middle part of the angle "float" when
adjusting the ends
7. Sand the full length of the flap. You have to work around the middle
all thread where it sticks up too far, easier done than explained.
8. Now check the fit of the flap. Hopefully you will need to remove more
balsa at the front! Adjust the angle down until you get it right on both ends
and the middle.
9. When the flap is just the right height, stop. Now sand it with a block,
freehand, with 180 grit or so, just remove the roughness. This is about the
thickness of the fiberglass.
10. (I think this part is right, my notes say it is, but go slowly and check.)
Now do the next flap section WITHOUT any adjustments. If your jig is right,
and your wing trailing edge is right, the jig should work without touching it
for the rest of the flap and ailerons. If not, adjust it. (You will have to
adjust it for the other wing's parts due the taper being reversed).
11. I used very light model aircraft fiberglass cloth with fiberglass resin.
The modern epoxies were not available when I did this, in about 1985. Today
I would use any good epoxy, like the West system. The glass can lap over the
front of the flap or aileron. It isn't in sight unless the flaps are down.